Search result
Connecting 13.1-channel speakers
This system, which is based on a 5.1-channel system, plays back up to 13.1-channels at the same time.
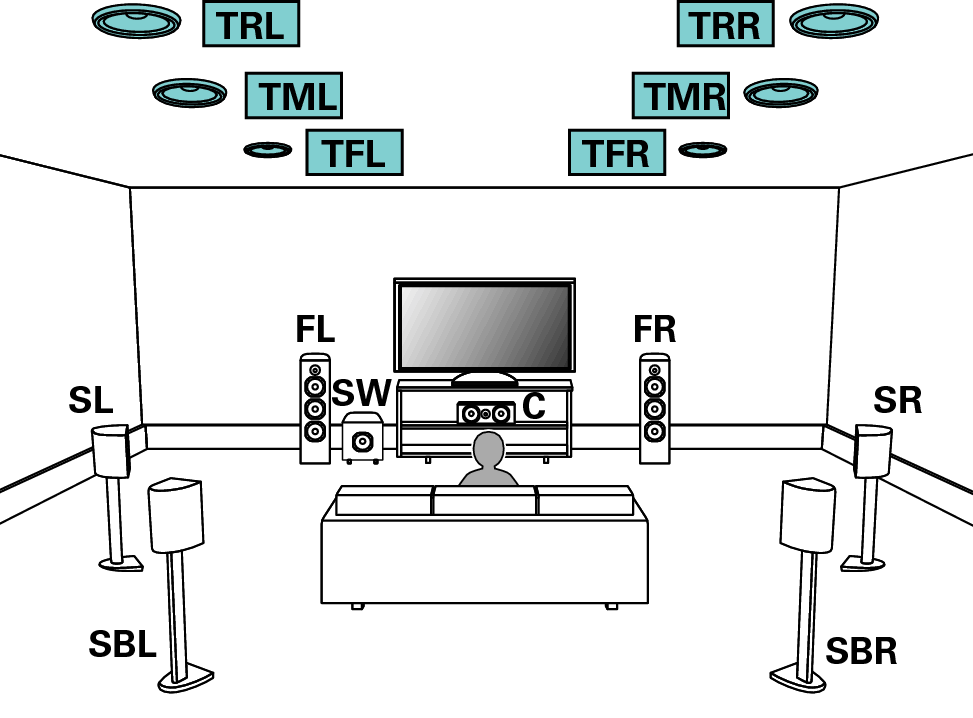
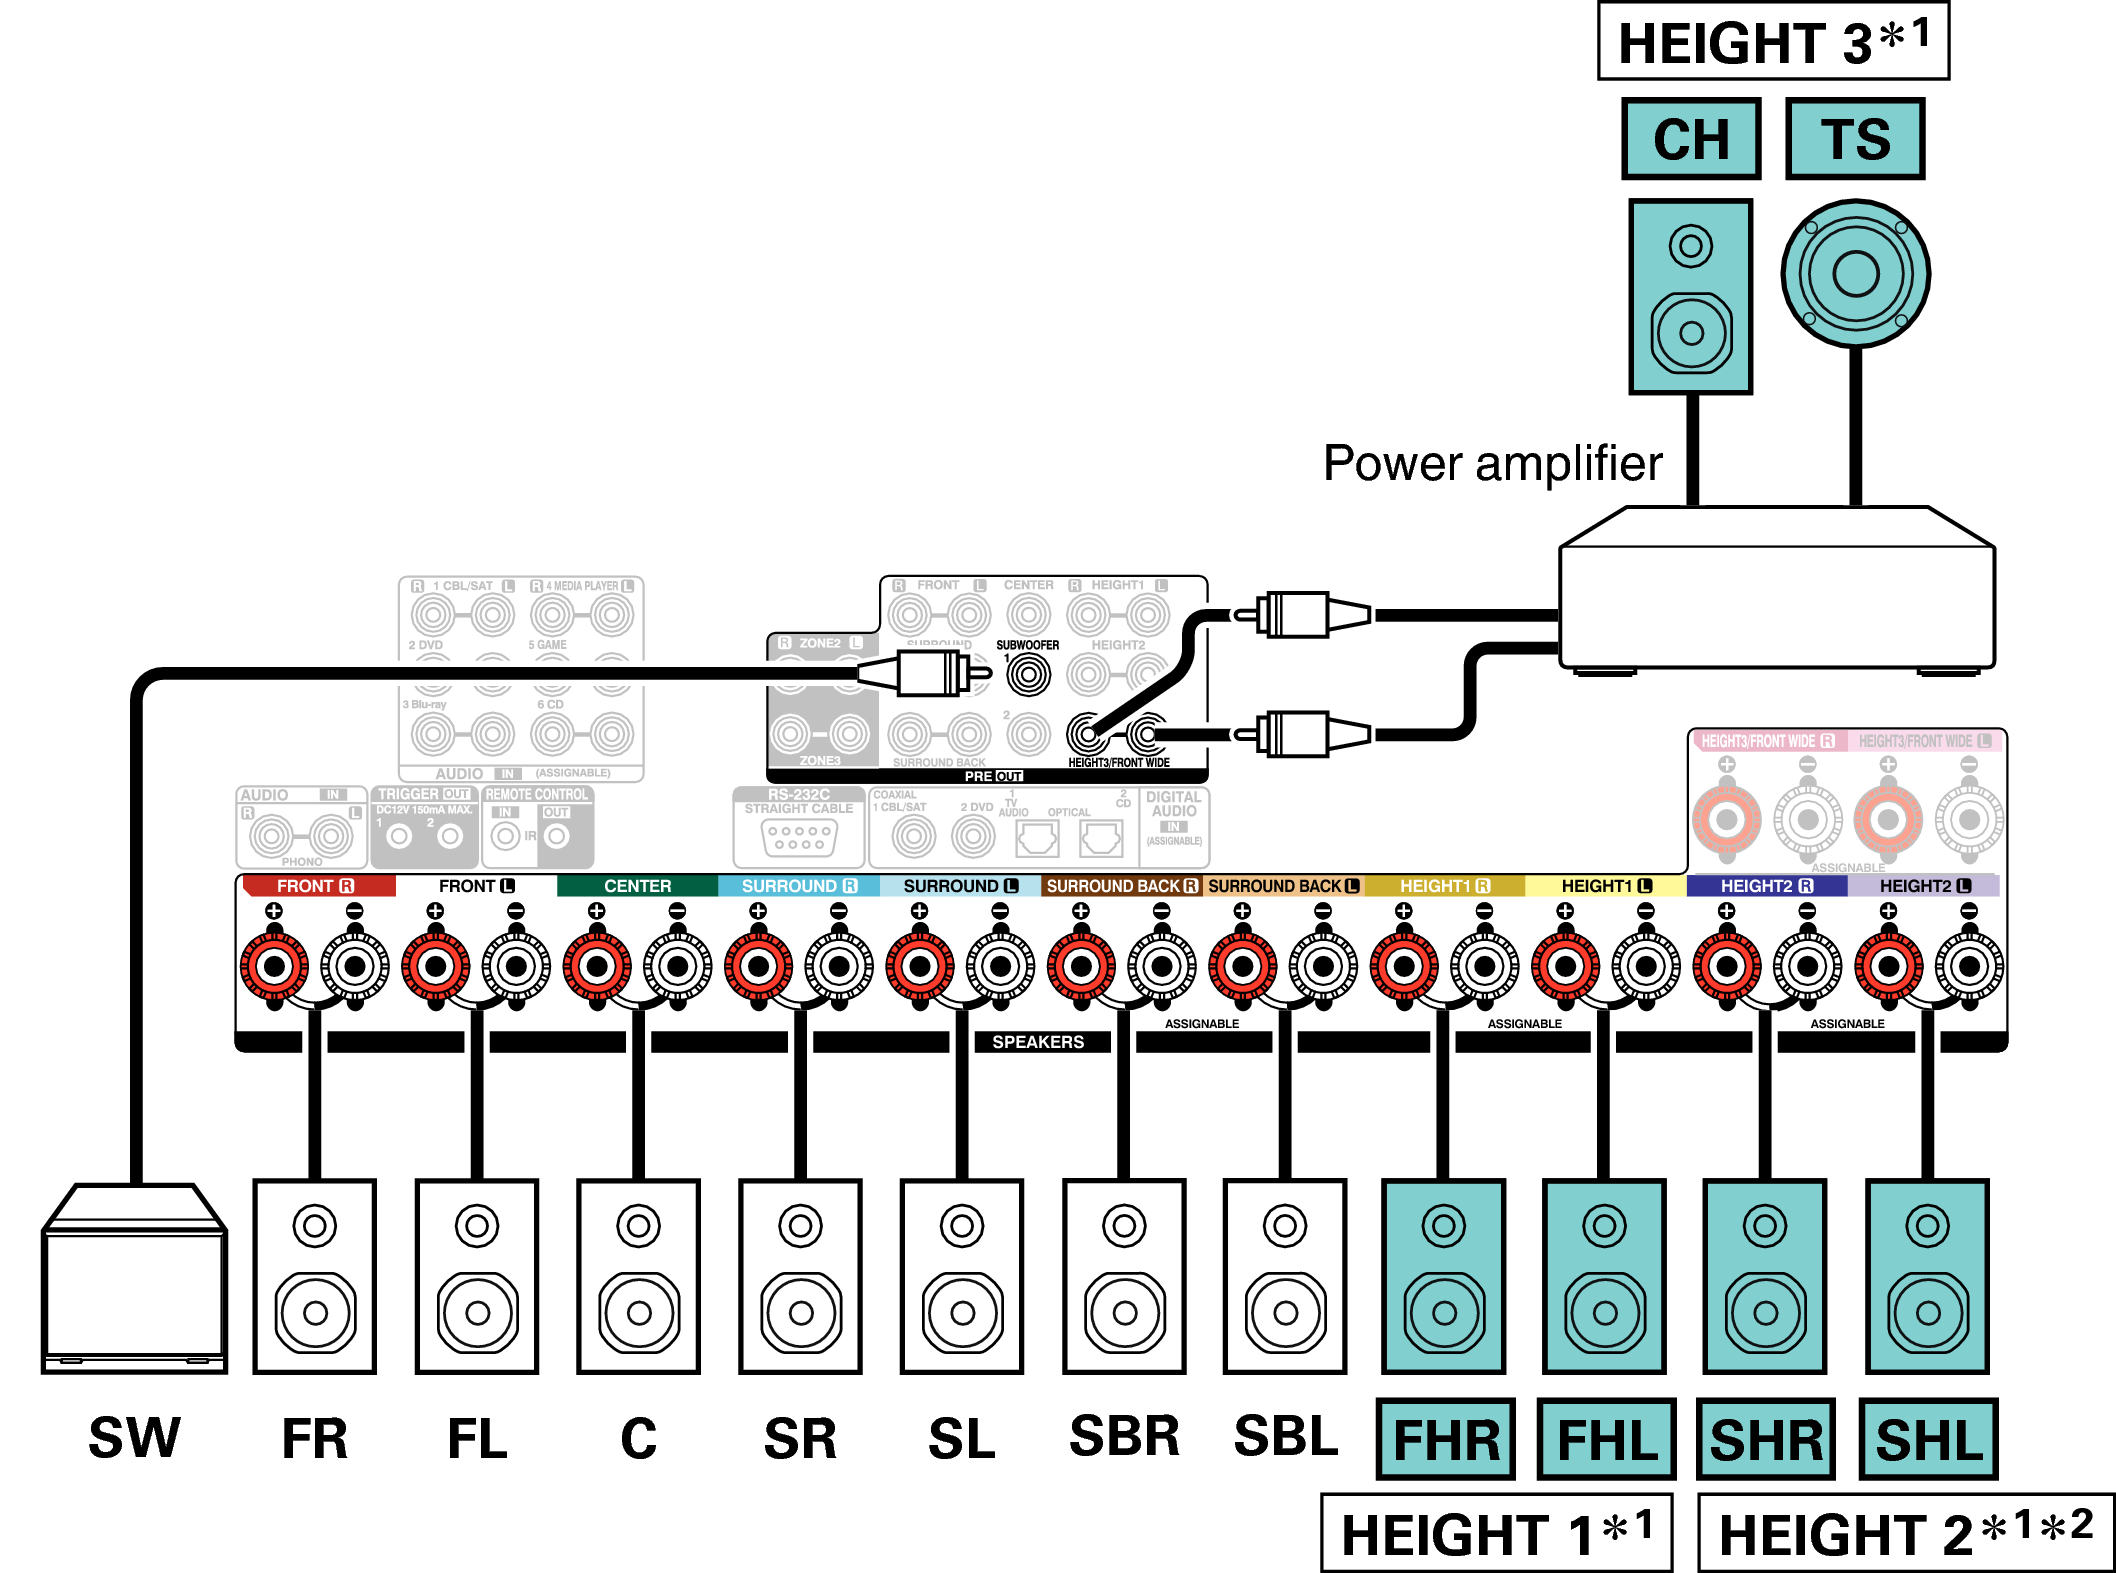
Example connection when using three sets of ceiling speakers
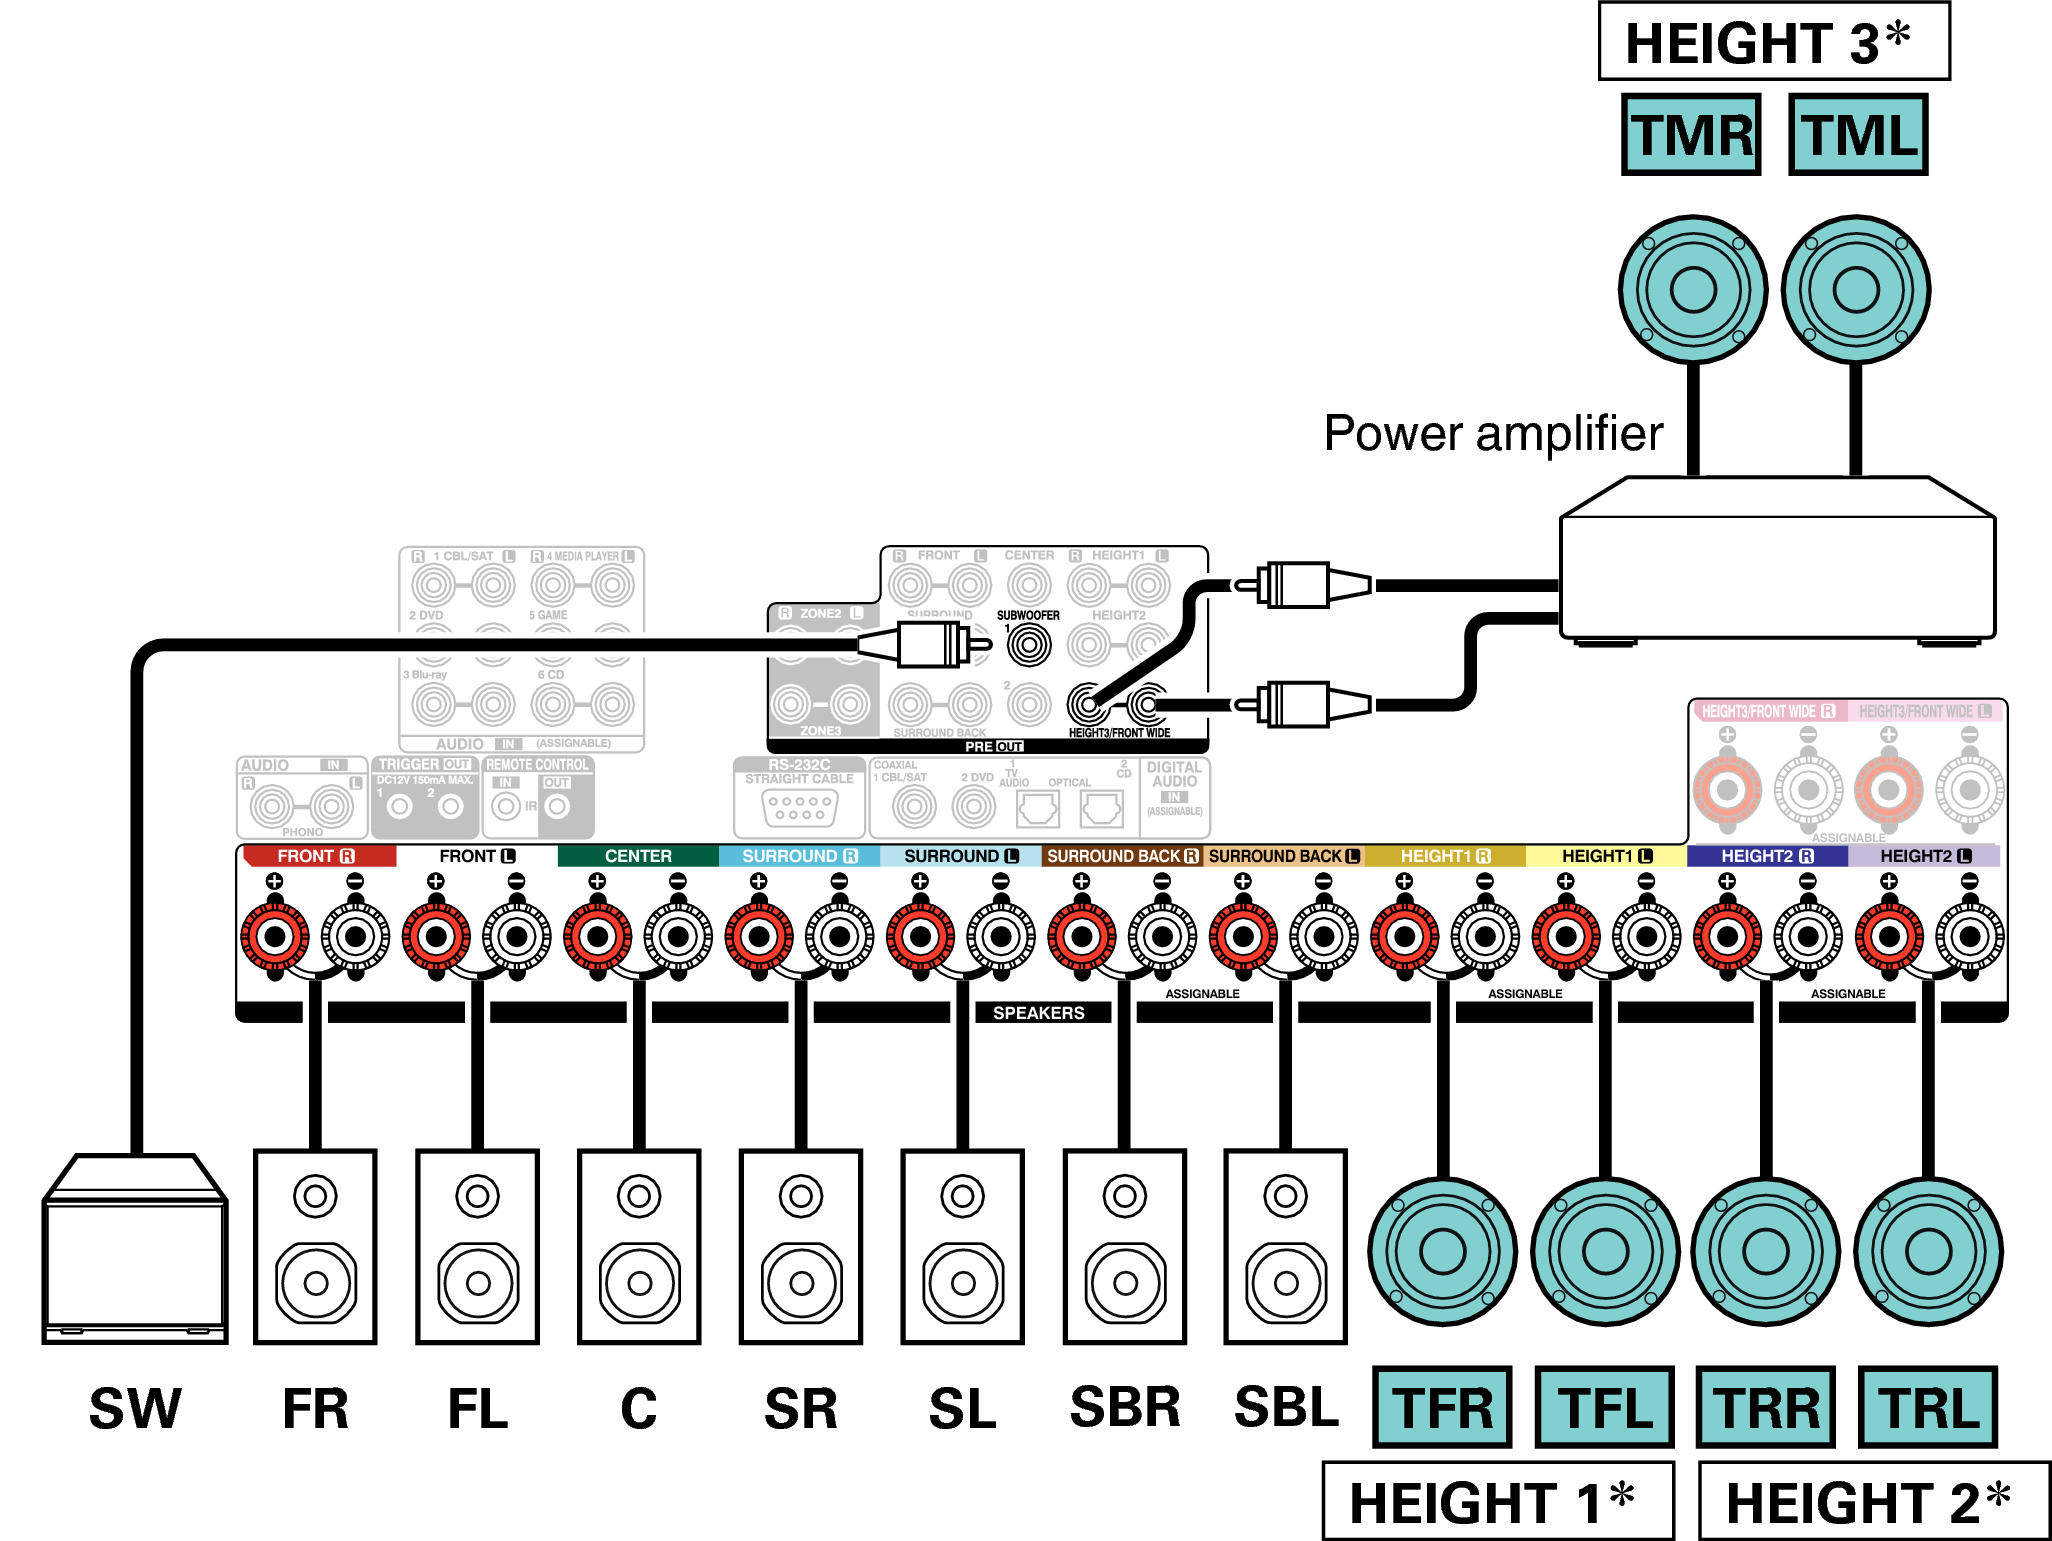
You can change the combination of the HEIGHT1, HEIGHT2 and HEIGHT3 channels in the settings. link
You can connect the external power amplifier to the Front channel instead of the Height3 channel. In this case, connect the Height3 channel to the HEIGHT 3/FRONT WIDE speaker terminals, and connect the external power amplifier to the PRE OUT connectors for the Front channel. Then, use the “Pre-out” setting in the menu to set “Front” for the channel connected to the external power amplifier.link
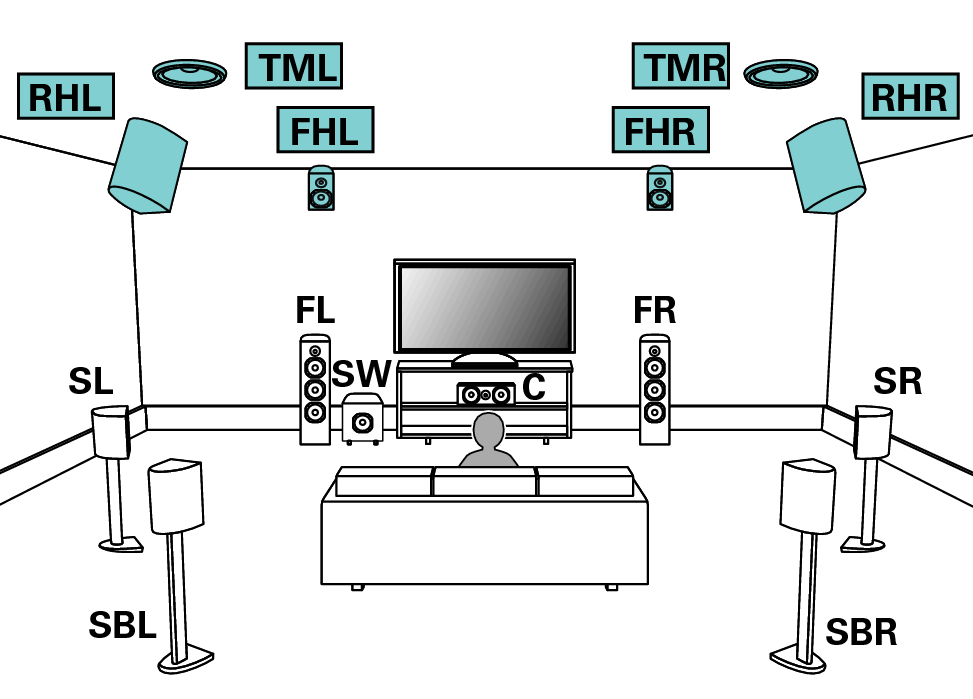
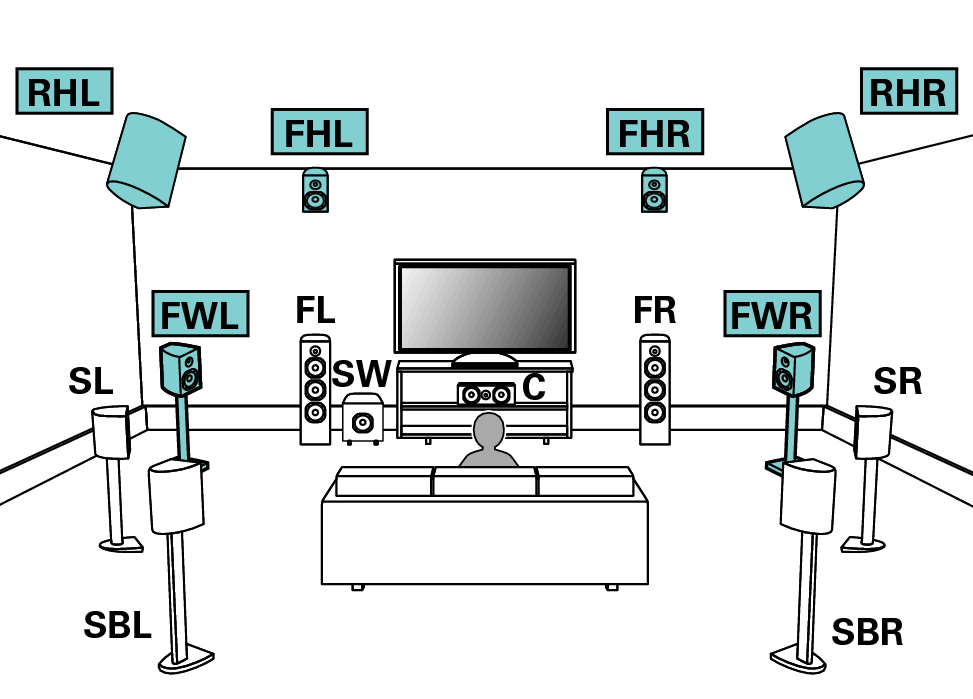
Example connection when using two sets of height speakers and one set of ceiling speakers
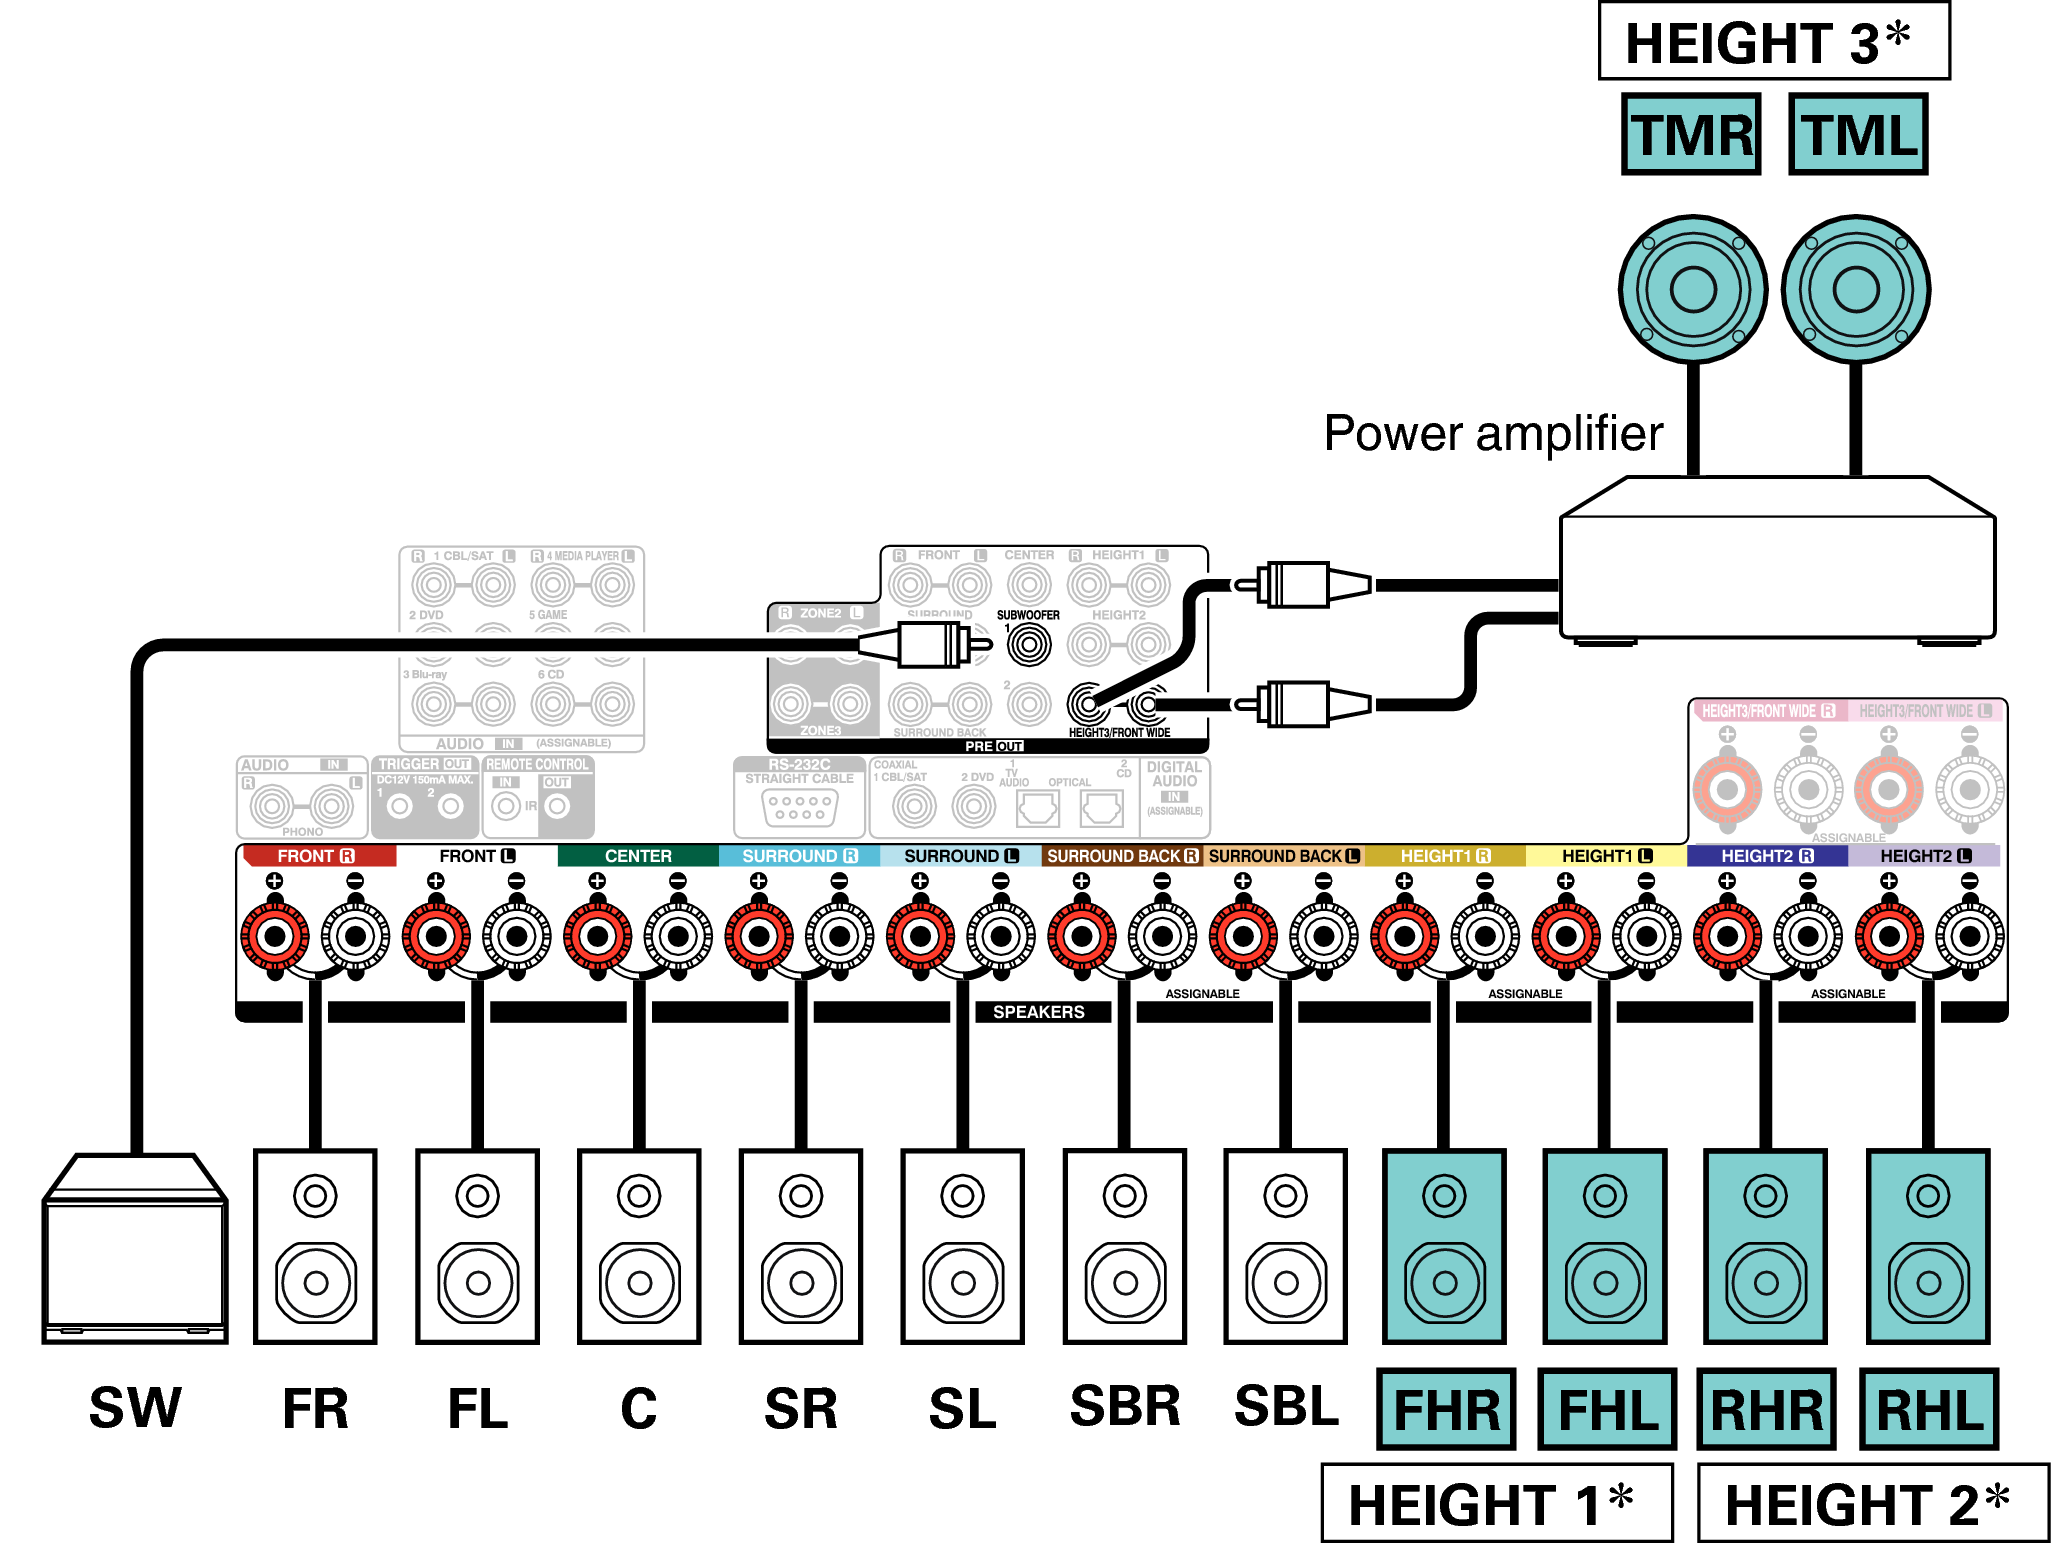
You can change the combination of the HEIGHT1, HEIGHT2 and HEIGHT3 channels in the settings. link
You can connect the external power amplifier to the Front channel instead of the Height3 channel. In this case, connect the Height3 channel to the HEIGHT 3/FRONT WIDE speaker terminals, and connect the external power amplifier to the PRE OUT connectors for the Front channel. Then, use the “Pre-out” setting in the menu to set “Front” for the channel connected to the external power amplifier.link
Example connection when using two sets of height speakers and one set of front wide speakers
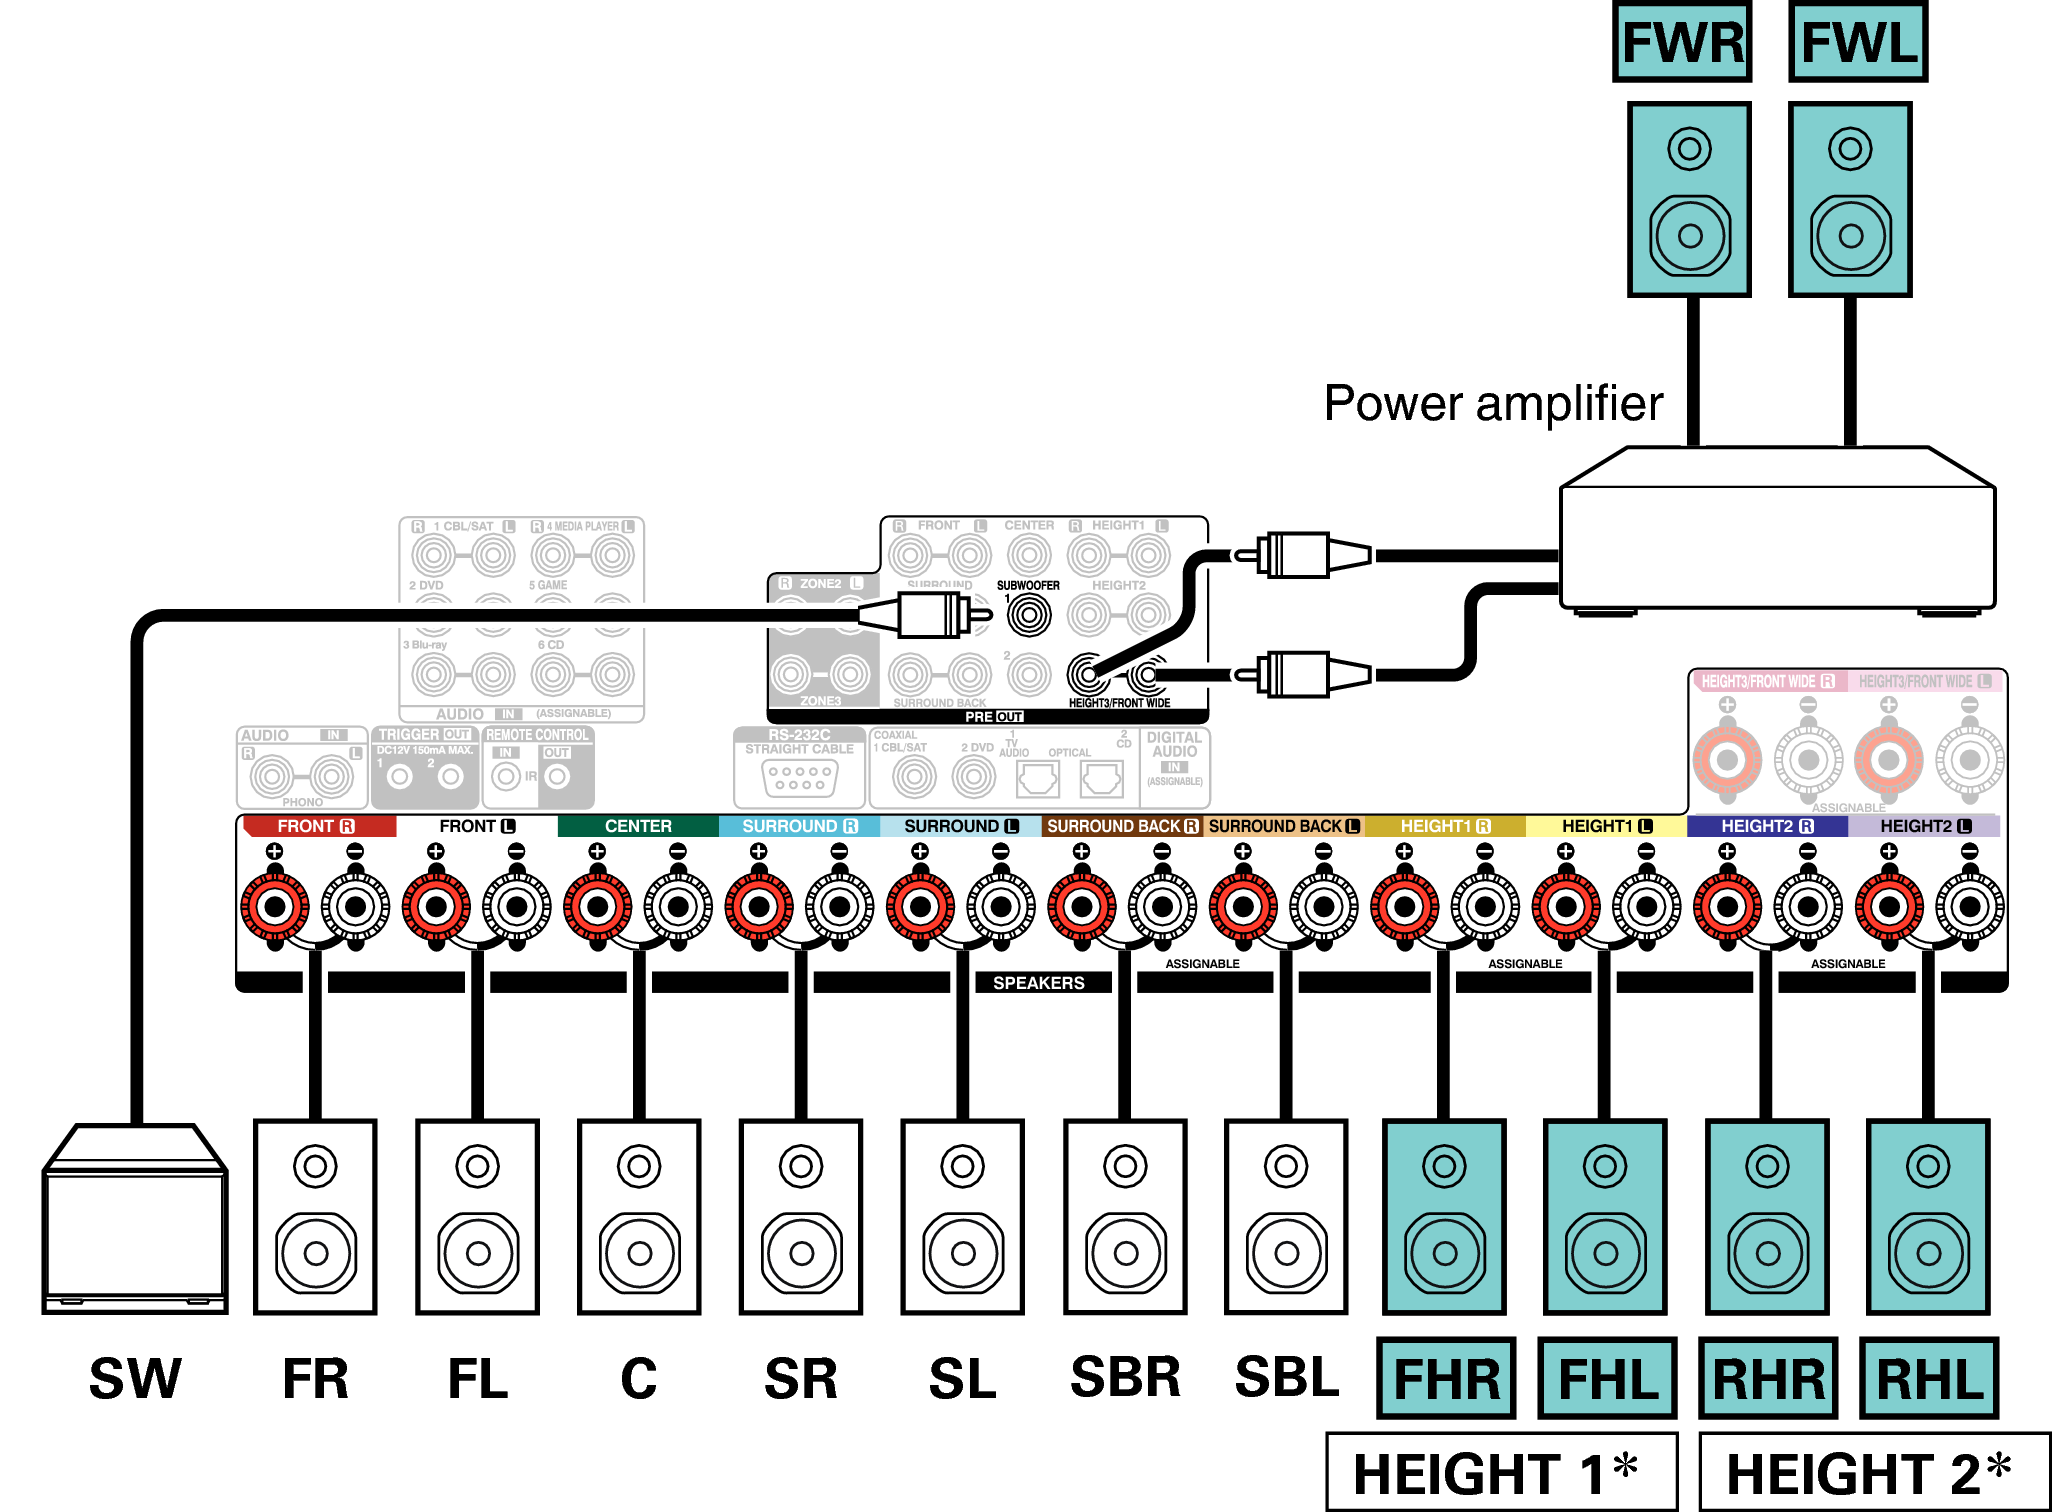
You can change the combination of the HEIGHT1 and HEIGHT2 channels in the settings. link
You can connect the external power amplifier to the Front channel instead of the Front Wide channel. In this case, connect the Front Wide channel to the HEIGHT 3/FRONT WIDE speaker terminals, and connect the external power amplifier to the PRE OUT connectors for the Front channel. Then, use the “Pre-out” setting in the menu to set “Front” for the channel connected to the external power amplifier.link
Example connection when using three sets of Dolby Atmos Enabled speakers
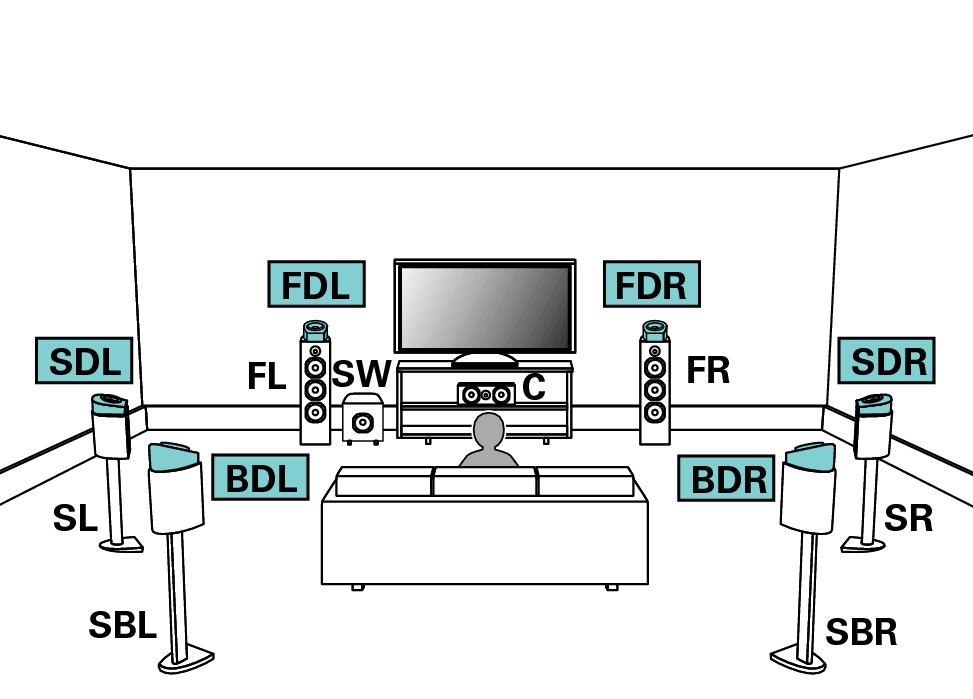

You can change the combination of the HEIGHT1, HEIGHT2 and HEIGHT3 channels in the settings. link
You can connect the external power amplifier to the Front channel instead of the Height3 channel. In this case, connect the Height3 channel to the HEIGHT 3/FRONT WIDE speaker terminals, and connect the external power amplifier to the PRE OUT connectors for the Front channel. Then, use the “Pre-out” setting in the menu to set “Front” for the channel connected to the external power amplifier.link
Example connection for the Auro-3D 13.1-channel system
This speaker configuration is optimized for Auro-3D playback.
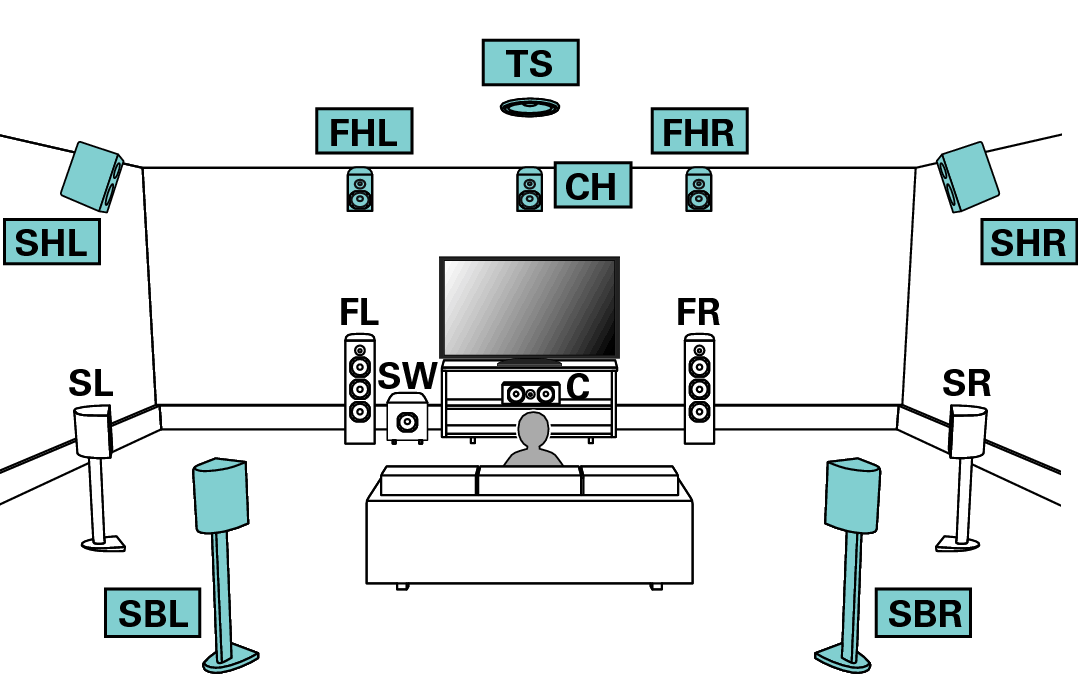
You can change the combination of the HEIGHT1, HEIGHT2 and HEIGHT3 channels in the settings. link
For the best Auro-3D experience Surround Height speakers are recommended, however you may substitute Rear Height speakers from a Dolby Atmos speaker setup in place of Surround Height speakers.
You can connect the external power amplifier to the Front channel instead of the Height3 channel. In this case, connect the Height3 channel to the HEIGHT 3/FRONT WIDE speaker terminals, and connect the external power amplifier to the PRE OUT connectors for the Front channel. Then, use the “Pre-out” setting in the menu to set “Front” for the channel connected to the external power amplifier.link
The combination of the HEIGHT1, HEIGHT2 and HEIGHT3 channels can be changed to the following patterns according to the speaker system being used.
Set this from “Amp Assign” in the menu. link
|
Combinations of height speakers to be used |
Connected speaker terminals |
|||||
|---|---|---|---|---|---|---|
|
|
Number of height / ceiling speakers |
Number of Dolby Speakers |
Combination pattern |
HEIGHT1 |
HEIGHT2 |
HEIGHT 3/ |
|
2ch |
2ch |
None |
Front Height |
Front Height |
- |
- |
|
Top Front |
Top Front |
- |
- |
|||
|
Top Middle |
Top Middle |
- |
- |
|||
|
Top Rear |
Top Rear |
- |
- |
|||
|
Rear Height |
Rear Height |
- |
- |
|||
|
None |
2ch |
Front Dolby |
Front Dolby |
- |
- |
|
|
Surround Dolby |
Surround Dolby |
- |
- |
|||
|
Back Dolby |
Back Dolby |
- |
- |
|||
|
4ch |
2ch |
2ch |
Front Dolby & Top Rear |
Front Dolby |
Top Rear |
- |
|
Front Dolby & Rear Height |
Front Dolby |
Rear Height |
- |
|||
|
Front Height & Surr. Dolby |
Front Height |
Surround Dolby |
- |
|||
|
Front Height & Back Dolby |
Front Height |
Back Dolby |
- |
|||
|
Top Front & Surr. Dolby |
Top Front |
Surround Dolby |
- |
|||
|
Top Front & Back Dolby |
Top Front |
Back Dolby |
- |
|||
 1
1|
Combinations of height speakers to be used |
Connected speaker terminals |
|||||
|---|---|---|---|---|---|---|
|
|
Number of height / ceiling speakers |
Number of Dolby Speakers |
Combination pattern |
HEIGHT1 |
HEIGHT2 |
HEIGHT 3/ |
|
4ch |
4ch |
None |
Front Height & Top Middle |
Front Height |
Top Middle |
- |
|
Front Height & Top Rear |
Front Height |
Top Rear |
- |
|||
|
Front Height & Rear Height |
Front Height |
Rear Height |
- |
|||
|
Front Height & Surr. Height |
Front Height |
Surr. Height |
- |
|||
|
Top Front & Top Rear |
Top Front |
Top Rear |
- |
|||
|
Top Front & Rear Height |
Top Front |
Rear Height |
- |
|||
|
Top Middle & Rear Height |
Top Middle |
Rear Height |
- |
|||
|
None |
4ch |
Front Dolby & Surr. Dolby |
Front Dolby |
Surround Dolby |
- |
|
|
Front Dolby & Back Dolby |
Front Dolby |
Back Dolby |
- |
|||
|
5ch |
5ch |
None |
Front Height & Rear Height & Top Surround |
Front Height |
Rear Height |
L: Top Surround |
|
Front Height & Surr. Height & Top Surround |
Front Height |
Surr. Height |
L: Top Surround |
|||
|
Front Height & Rear Height & Center Height |
Front Height |
Rear Height |
R: Center Height |
|||
|
Front Height & Surr. Height & Center Height |
Front Height |
Surr. Height |
R: Center Height |
|||
|
Combinations of height speakers to be used |
Connected speaker terminals |
|||||
|---|---|---|---|---|---|---|
|
|
Number of height / ceiling speakers |
Number of Dolby Speakers |
Combination pattern |
HEIGHT1 |
HEIGHT2 |
HEIGHT 3/ |
|
6ch |
6ch |
None |
Front Height & Surr. Height & Rear Height |
Front Height |
Rear Height |
Surr. Height |
|
Front Height & Rear Height & Top Surround & Center Height |
Front Height |
Rear Height |
L: Top Surround |
|||
|
Front Height & Surr. Height & Top Surround & Center Height |
Front Height |
Surr. Height |
L: Top Surround |
|||
|
Front Height & Top Middle & Rear Height |
Front Height |
Rear Height |
Top Middle |
|||
|
Top Front & Top Middle & Top Rear |
Top Front |
Top Rear |
Top Middle |
|||
|
4ch |
2ch |
Front Height & Surr. Dolby & Rear Height |
Front Height |
Rear Height |
Surround Dolby |
|
|
Top Front & Surr. Dolby & Top Rear |
Top Front |
Top Rear |
Surround Dolby |
|||
|
2ch |
4ch |
Front Height & Surr. Dolby & Back Dolby |
Front Dolby |
Back Dolby |
Surround Dolby |
|
|
Front Dolby & Top Middle & Back Dolby |
Front Dolby |
Back Dolby |
Top Middle |
|||
|
Front Dolby & Surr. Dolby & Rear Height |
Front Dolby |
Rear Height |
Surround Dolby |
|||
|
None |
6ch |
Front Dolby & Surr. Dolby & Back Dolby |
Front Dolby |
Back Dolby |
Surround Dolby |
|
Connect to the HEIGHT3/FRONT WIDE speaker terminal to use Front Wide speakers. Set “Floor” in the menu to “5ch & FW” or “5ch & SB & FW”. link
This combination can be selected when using Surround Back speakers.
For the best Auro-3D experience Surround Height speakers are recommended, however you may substitute Rear Height speakers from a Dolby Atmos speaker setup in place of Surround Height speakers.
Use 2 sets of Height speakers in the appropriate sound modes for Dolby Atmos, DTS:X or Auro-3D playback.
Use the Front Height and Rear Height speakers for Dolby Atmos or DTS:X playback.
Use the Front Height and Surround Height speakers for Auro-3D playback.
This combination can be selected when “Floor” in the menu to “5ch” or “5ch & SB”. link